debian-setup
Manual Partitioning
This is the step Partition disks. Partitioning method is Manual.

The manual partitioning screen has 3 sections. The first section are the top-level operations. Of particular interest is Configure Software RAID. Toward the end of this page, there is discussion of creating a software RAID. The second section lists the disks and, under each disk, its partitions. The third section are menu items fo finalize the partitions.
Select a disk to create an empty partition table.
Note, if you want to keep the existing data, select the partition instead. Flip Use as: do not use to Use as: Ext4 journaling file system. And then Format the partition: no, keep existing data. Lastly set up the mount point and the mount options.
Below shows a disk selected for creating a partition table.

Partition table type gpt.

Select the free space to set up the partitions.

Set up the partion with the correct format Ext4 journaling, mount point, and mount options. Below shows a partition where we want to keep the existing data on it.

Example Partitions
You may notice the discard mount option for SSD drive.
| Drive | Mount Point | Type | Size | Mount Options | Typical Usage | Note |
|---|---|---|---|---|---|---|
| sda (256 GB SSD) | EFI | 256 MB | FAT32 | |||
| / | EXT4 | 96 GB | discard, relatime | standard | ||
| /usr/local | EXT4 | 32 GB | discard, relatime, nodev | largefile | ||
| /opt | EXT4 | 32 GB | discard, relatime, nodev | largefile | ||
| /home | EXT4 | remaining | discard, relatime, nodev, nosuid | standard | ||
| sdb (1 TB spinning) | SWAP | 128 GB | ||||
| /var | EXT4 | 128 GB | relatime, nodev, nosuid | news | ||
| /tmp | EXT4 | 128 GB | relatime, nodev, nosuid, noexec | news | ||
| /data | EXT4 | remaining | relatime, nodev, nosuid, noexec | largefile4 | ||
| RAID10 | /samba | EXT4 | 4 TB | relatime, nodev, nosuid, noexec | largefile4 |
More examples for larger disks.
| Drive | Mount Point | Type | Size | Mount Options | Typical Usage | Note |
|---|---|---|---|---|---|---|
| sda (512 GB NVMe) | EFI | 512 MB | FAT32 | |||
| / | EXT4 | 128 GB | discard, relatime | standard | ||
| /usr/local | EXT4 | 96 GB | discard, relatime, nodev | largefile | ||
| /opt | EXT4 | 96 GB | discard, relatime, nodev | largefile | ||
| /home | EXT4 | remaining | discard, relatime, nodev, nosuid | standard | ||
| sdb (2 TB spinning) | SWAP | 196 GB | 128 GB memory | |||
| /var | EXT4 | 256 GB | relatime, nodev, nosuid | news | ||
| /tmp | EXT4 | 256 GB | relatime, nodev, nosuid, noexec | news | ||
| /data | EXT4 | remaining | relatime, nodev, nosuid, noexec | largefile4 | ||
| RAID10 | /samba | EXT4 | 4 TB | relatime, nodev, nosuid, noexec | largefile4 |
One 2 TB NVMe and a RAID10 array of 4x 16 TB spinning disks.
| Drive | Mount Point | Type | Size | Mount Options | Typical Usage | Note |
|---|---|---|---|---|---|---|
| sda (2 TB NVMe) | EFI | 512 MB | FAT32 | |||
| SWAP | 128 GB | 128 GB memory | ||||
| / | EXT4 | 256 GB | noatime, nodiratime | standard | ||
| /tmp | EXT4 | 256 GB | noatime, nodiratime, nodev, nosuid, noexec | news | ||
| /var | EXT4 | 256 GB | noatime, nodiratime, nodev, nosuid | news | ||
| /opt | EXT4 | 256 GB | noatime, nodiratime, nodev | largefile | ||
| /usr/local | EXT4 | 256 GB | noatime, nodiratime, nodev | largefile | ||
| /home | EXT4 | remaining | noatime, nodiratime, nodev, nosuid | standard | ||
| RAID10 | /samba | EXT4 | 32 TB | relatime, nodev, nosuid, noexec | largefile4 |
Finally it lets you review the partitions. Scroll to the bottom of the review list, choose Finish partitioning and write changes to disk.
Note one use of the partition mounted at /data (or /stash as shown) is to link to the datasets folder of a project, e.g. /data/<usr>/<project> is linked to ~/Workspace/<project>/datasets.

Go back to Installation
Software RAID
First, let’s talk briefly about hardware RAID. If you have set up RAID in the BIOS and have correctly edited the command Expert install, the RAID should appear here as a single disk. Partition it as if it is a single disk. Again this is for setting up a hardware RAID.
Now software RAID is different from hardware RAID. See the screenshot below for software RAID.

Software RAID is the preferred RAID. There is an option Configure software RAID (the first blue box in the screenshot). Once set, the RAID will appear as a single disk (the second blue box). The third blue box list the disks composing the RAID. Do not touch them.
If you have a previously set software RAID, as the RAID configuration is written on the disks, it should show up here as a single device. You do not need to configure the RAID again. For example, mine just shows up as RAID10 device #0. It is from a previous install.
You can keep the data already on the RAID device. Here is how: Select the partition (not the disk) on the RAID disk. Flip Use as: do not use to Use as: Ext4 journaling file system and Format the partition: no, keep existing data. Set up the mount point and mounting options.
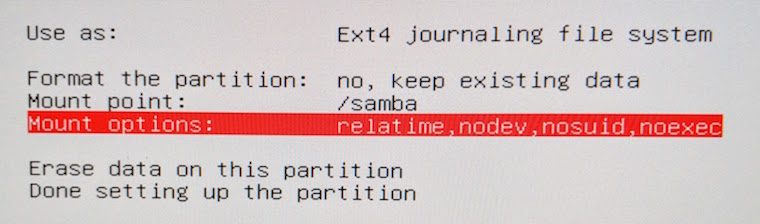
In fact, this applied not only to RAID partitions but also to any partition. Note, even if we keep the existing data, we still need to mount the partition and set the mount options (see the above table). The exception is the swap partition. It is already marked as F (format it) and nothing needs to be done for it.
Go back to Installation
Other Notes, Links
- About partitions
- What should NOT be on separate partitions
- The root
/has/bin,/etc,/liband they should be kept on the same partition. - Also avoid mounting
/usron a separate partition. Nowadays, the/usrdirectory has most of the system installed binaries, kernel source tree (e.g. Arch Build Tree), documentations.
- The root
- Recommended partitions
/usr/localinstalls packages, built by the user (viamake install), outside the system’s package manager./optinstalls self-contained packages./varpackage cache (note that packages may be executed here, so do not set theno execflag), spool (for mail, printing), logs.
- Useful commands
fdisk -lorgdisk -lto list partitions.mkfsto build a Linux file system on a hard disk partition.lsblkto list block devices. It reads thesysfsfile to gather the information.less /etc/fstabto view the file system tabs.
- SSD Notes
Go back to Installation